Cylinder#
Setting Up the Environment#
First, make sure the SALOME platform is installed and note its path, referred to here as $PathToSALOME. If you don’t have SALOME installed, you can download it here.
Then, create a working directory and launch SALOME:
mkdir -p TRUST_tutorials/salome/exo1
cd TRUST_tutorials/salome/exo1
$PathToSALOME/salome &
Creating the Geometry#
Create a new study: File → New
Select the Geometry module from the SALOME drop-down menu (which lists all available modules)
Save your study frequently in HDF format (SALOME’s native format)
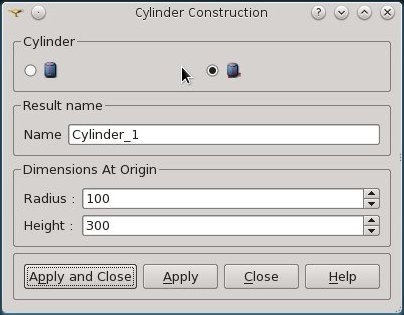
Create the cylinder:
Go to: New Entity → Primitives → Cylinder
Set Radius
R = 100and HeightH = 300(default values)Click “Apply and Close”
Navigate the view:
Use the “Interaction style switch” (Mouse icon) to rotate, zoom, and pan the geometry
Defining Boundary Groups#
To define boundaries for TRUST, we need to create groups for the top, bottom, and lateral surfaces:
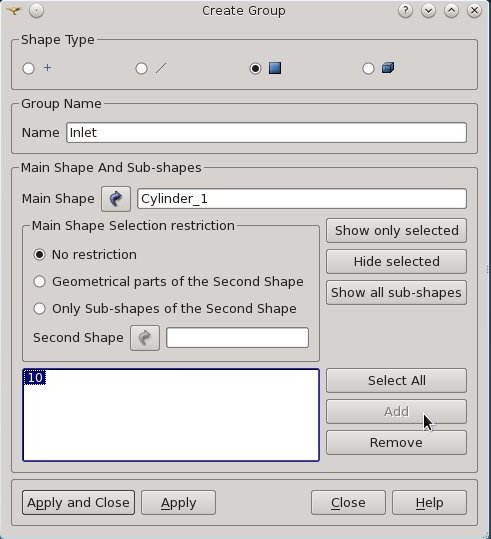
Create groups: New Entity → Group → Create Group
Select Shape Type: Surface
Create the “Inlet” group (top):
Group Name:
InletClick the arrow button in the Main Shape field
Select “Cylinder_1” from the Object Browser or the visualization window
Click on the top surface of the cylinder
Click “Add” → “Apply”
Create the “Wall” group (lateral surface):
Repeat the process with Group Name:
WallSelect the lateral surface
Create the “Outlet” group (bottom):
Group Name:
OutletRotate the cylinder to access the bottom surface
Select and add it
Verify: Check that all three groups appear in the Object Browser (click the “▷” next to “Cylinder_1”)
Creating the Mesh#
Switch to the Mesh module from the SALOME drop-down menu
Display the geometry:
Select “Cylinder_1” in the Object Browser
Right Click → ‘Show’ (or click the eye icon)
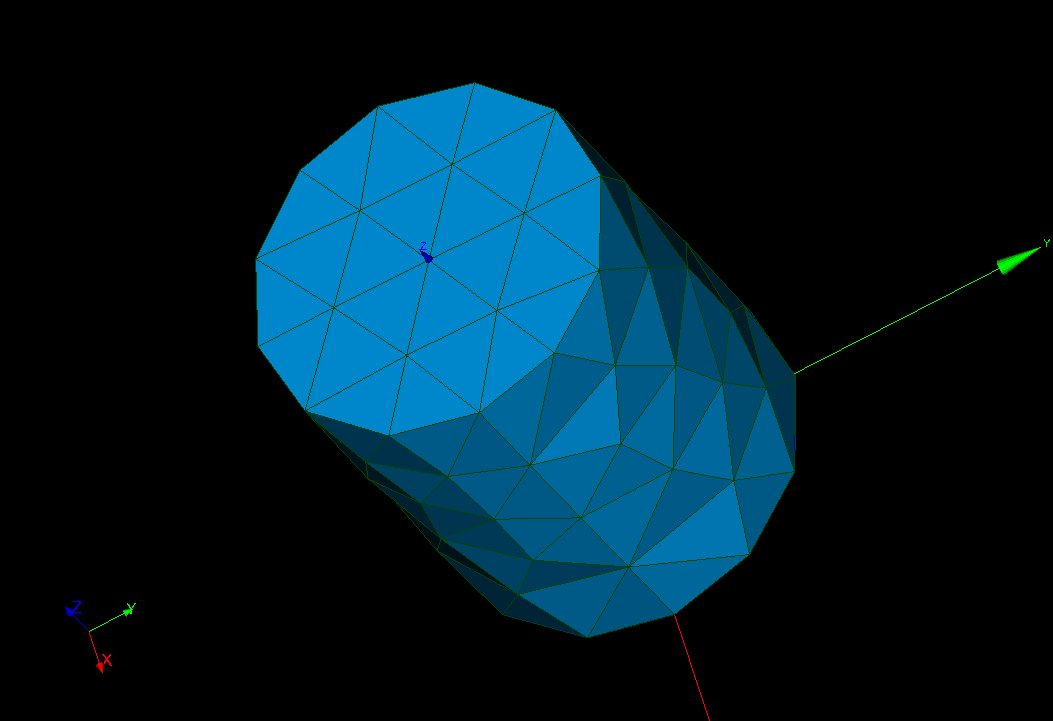
Create the mesh:
Go to: Mesh → Create Mesh
Select “Cylinder_1” as the geometry (if not already selected)
Choose the “Netgen 1D-2D-3D” algorithm
Click “Apply and Close”
Compute the mesh:
Select “Mesh_1” in the Object Browser
Right Click → Compute (or Mesh → Compute)
A table showing the number of triangles, quadrangles, etc. will appear
Click “Close”
Hide the geometry:
Select “Cylinder_1” in the Object Browser
Right Click → Hide (or click the eye icon)
Exporting the Mesh#
Verify boundary groups: Check that the three boundaries have been automatically added to the “Group of Faces” of the Mesh_1 object in the Object Browser
Export to MED format:
Select “Mesh_1”
Right Click → Export → MED file (or File → Export → MED file)
Save as
Mesh_1.med
Reading the Mesh with TRUST#
Create a TRUST data file named dom.data:
dimension 3
domaine dom
Read_MED { domain dom file Mesh_1.med }
Postraiter_domaine { domaine dom fichier mesh format lata }
Run TRUST and visualize with VisIt:
trust dom
visit -o mesh.lata
Warning: A common mistake is forgetting to define boundary groups for the geometry. TRUST will detect this during discretization when building all mesh faces, including boundary faces.
Refining the Mesh with Viscous Layers#
To improve mesh quality near walls, viscous layers can be used:
Create a new mesh: Mesh → Create Mesh
Name:
Refined_meshSelect “Cylinder_1” geometry
Select a 3D algorithm: “Netgen 3D” or “MG-Tetra”
Add viscous layers:
Click the wheel icon next to “Add. Hypothesis” → “Viscous Layers”
Total thickness:
30Number of layers:
3Stretch factor:
1.1Add the “Inlet” and “Outlet” groups to “Faces without layers”
Click “OK”
Add a 2D algorithm: “Netgen 1D-2D” or “MG-CADSurf”
Configure 2D parameters:
Click the wheel icon next to “Hypothesis”
For Netgen 2D parameters:
Change “Fineness” from “Moderate” to “Very Fine”
For MG-CADSurf parameters:
Set “User size” to
20
Apply and compute:
Click “Apply and Close”
Select “Refined_Mesh” in the Object Browser
Right Click → Compute
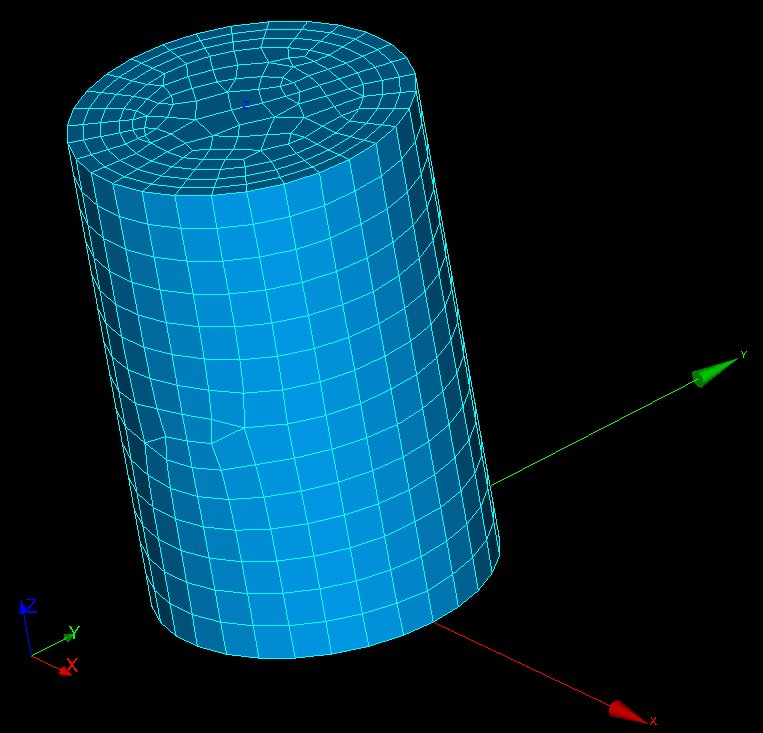
The resulting mesh will contain a mix of tetrahedral, hexahedral, pyramid, and prism elements (for Netgen) or tetrahedral and prism elements (for MG algorithms).
Converting to Tetrahedral Elements#
Since TRUST only accepts tetrahedral elements:
Select “Refined_Mesh” in the Object Browser
Go to: Modification → Split Volumes
Select “Tetrahedron”
Keep the default parameters
Click “Apply and Close”
Final Steps#
Verify boundaries: Check that the three boundaries are listed under “Group of Faces” of Refined_Mesh
Export the mesh:
Select “Refined_mesh”
Right Click → Export → MED file
Save as
Refined_Mesh.med
Save your work:
HDF format: File → Save/Save As…
Python format: File → Dump Study…
Note
Solution files (mesh.py for the first mesh and prism.py for the refined mesh) are available at: $TRUST_ROOT/doc/TRUST/exercices/salome